Japanese Deco Roll Cake - More Than A Swiss Roll

I posted a photo on instagram of the deco roll cake that I made, and seeing as so many people loved it (and it wasn't actually that hard to make) I thought i'd share the recipe I followed and genrally rave about the Japanese craze for the cutest cakes in town.

1. Sugar for the brain / 2. Evan's Kitchen Ramblings / 3. Temps*Convivial / 4. Evan's Kitchen Ramblings  - check out these amazing cakes and tutorials! 

So what is a roll cake? Well... it's basically a swiss roll. Deco roll cake is popular in Japan and literally means decorated roll cake. You get the pattern on your sponge by first tracing a pattern onto a baking paper lined baking sheet using some cake mix in a piping bag before popping it into the freezer. Once you've made the rest of your cake mix, pour it over the top of your frozen pattern and bake. Magic!

I followed the recipe and tutorial from Dulce Delight who also gives you some free printable pattern templates. I also filled mine with her suggested filling of white chocolate ganache, whipped cream and strawberries. I will add that I made a stupid error of a) over whipping the cream and b) then spreading it onto the cake before it was properly cooled down. I knew this was wrong yet I did it anyway. Whoops.


Here's how my first attempt turned out....


It's not perfect but it tasted great and still managed to look pretty! I'll definitely be trying out some more of these bad boys!

Bow tutorial & downloadable template


I hope you enjoy todays tutorial - how to make an easy bow that can be used to decorate lots of different things! Make them out of felt, leather or some awesome scrap booking paper. Here's how to do it...

To make things easy and hopefully helpful, download the template I created HERE. Print and cut out.


Draw around or pin your template pieces onto your felt or paper and cut out. 


Take the bow section and fold the outside tab into the middle of the bow, securing with some glue. When using felt, a hot glue gun is the perfect thing to use but if you have some fabric glue, go ahead and use that. 


Repeat with the other side so that both of your tab ends are secured into the middle forming your bow!


Take the middle section of felt or paper and place in the middle of your bow.


Flip the bow over and stick down one end. Trim any excess length. 


Fold over and stick the other end. This side is the back of your bow as the join is there.


Finally apply some glue into the centre of your tail piece and stick onto the back of the bow covering the join you just made.


Repeat the whole process and make more and more!


Stick them on pegs, glue on a magnet or make some gift tags. Job done.


How to use cocoppa & change iPhone icons (because it's so cute!)

I can't quite remember how I came across it, but last night I downloaded the CocoPPa app and spent an enjoyable Sunday night making my phone look pointlessly cute! I thought this might interest a few of you so decided to break it down in a 'How To' of the app.


Ok first things first - these steps show you how to change downloaded app icons such as facebook, Twitter etc. Your new, super cute icon for say, Facebook is a SHORTCUT. You will still need to keep the original app but you can put all of these icons in a folder out the way. If you want to go back to using your original icon, just delete the cute shortcut icon. 

Step 1: Download cocoppa for free from the app store. When you run the app it will ask you to make a quick profile. Once you've done this, you're ready to go!

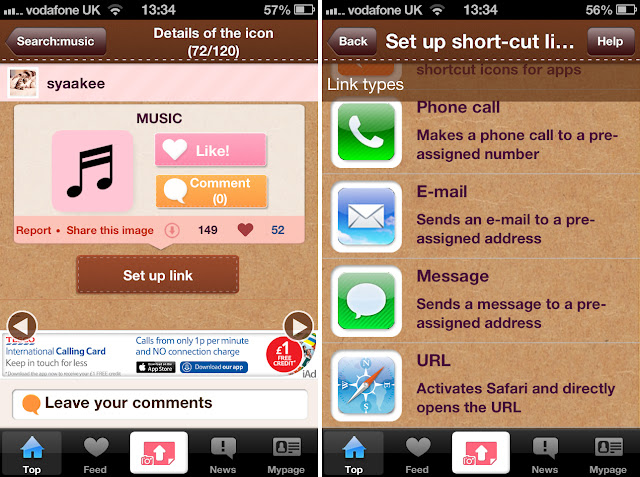
Step 2: When you first open the app, it will look like this. 


Step 3: Browse around the site for icons you like. As this app was more for the Asian market, the search doesn't always show up the best things due to a lot of the icon descriptions being in Japanese etc.  But the categories/colour sections are great and browsing is fun anyway! When you see an icon you fancy, click like! and it will save it in a list for you that can be found on the Mypage section.

If you're ready to set the icon then click on the 'set up link' button.


Step 4: You'll be given a set of choices for your icon shortcut. As i'm showing you how to set an app icon, select the app search. 

Step 5: A lot of the popular apps are show in a list but if not, just search it and it should come up. 


Step 6: Decide if you want to add gloss to your icon and set the icon name. 

Step 7: Press OK and then then YES to add icon to your Homescreen.


Step 8: The app will open up this page in Safari, press the arrow button.

Step 9: Once your image displays, click it to add to Homescreen. 


Step 10: Change the name of the app if you need to. 

Step 11: Admire your new icon app and repeat the process!


To change standard Apple app icons is a little bit harder (these are any icons you can't actually delete like mail, photos and music.

Step 1: Repeat steps 1-4. When you chose your shortcut link type, select URL.


Step 2: Rather than adding in a URL you can use the following:

To open music = Music:
To open photos = Photos-redirect://
To open calculator: showcal://
To open messages: SMS:
Top open maps: Maps:
To open mail: Mailto:


It's also worth noting that there isn't always an option for the app you use in the search, for instance, I couldn't change my camera icon so I downloaded Line Camera (which is free AND amazing!) so sometimes it's worth downloading one of the suggested apps instead. Hopefully everything else is pretty straight forward but if you do have any questions, let me know and maybe we can figure it out! 

My wallpaper is by rabaniiito

DIY Confetti Bow

A while back I got slightly carried away in Hobbycraft and ended up buying a bag of confetti scraps only to be stuck racking my brains with what to do with it all. At the time I knew I *really* needed it, one of those situations. 

I downloaded a gift wrapping guide by Hello Sandwich some time ago and saw that she she made a sequin bow so, I thought i'd give it a try using the confetti. Needless to say I still have a load of confetti left so if you have any other ideas on what I can use it for, do leave me a comment!

To make the bow you'll need:


Scissors
Washi Tape or a Twist Tie
Sticky Back Plastic
Confetti (circles of coloured paper cut out with a hole punch would look awesome too!)


Cut a square of the sticky back plastic 18cm x 18cm and fold in half to make a crease.


Peel back one half of the sticky back plastic and sprinkle with confetti pieces.


Peel off the backing of the sticky back plastic and fold over your sprinkled side to sandwich the confetti between the 2 layers. This step is a bit tricky as everything wants to stick to places you don't want it to!


Fold your sheet of confetti plastic into an accordion and secure with washi tape in the middle to create your bow. Using a hot glue gun, stick your bow onto a freshly wrapped gift!  


Ta-da!

Guilt free chocolate goodness


A couple of years ago I started to follow the Paleo Diet. Now, while I actually quite liked it, as someone who wanted to train as a pastry chef, the two things just don't go together, but there are still elements of it that I follow and have added into my normal way of life. 

So the story goes - one night I was craving (which is nothing new) and feeling a bit irritable because I wanted something sweet (was more than likely a toffee crisp... usually is) and I started googling for paleo friendly cakes, sweets and desserts. I found Chocolate Covered Katie and her recipe for fudge babies. 

My best friend Zach, who was also following it at the same time, got a phone call from me along the lines of "Are these paleo? Am I allowed them? How many of them can I eat?" and his reply was something along the lines of "Fudge babies? What sort of name is that? They have dates in them? I hate dates!". The End. 

So anyway, I decided to make them and i've loved them ever since! I would describe them as soft and chewy balls of chocolaty goodness. I'm not gonna lie... the word balls makes me smirk. Such a child. 

Now, here's 2 keys points; If you think you don't like dates, remember that they are the basis of sticky toffee pudding. If you have a friend *cough cough* Zach *cough* who keeps insisting that they don't like dates and refuse to try one, be the good and caring friend that you are and force them to eat it. What happens, Lisa is right, Zach loves them, Zach revisits my fridge and eats a load. 

Secondly, and this is the difference between them tasting nice or tasting AWESOME - PUT THEM IN THE FRIDGE! My GOD it makes so much difference and intensifies the chocolate taste and gives the more fudge like texture. Make that the golden rule and you'll thank me!

*Warning - highly addictive*

You'll need:

Food Processor
1tsp vanilla extract
2tbsp cocoa powder 
100g walnuts
250g soft pitted dates
Small paper cases
Small handful of tripple chocolate curls (optional)


Measure out all your ingredients and throw into a food processor. Blitz until everything starts sticking together, you'll know when it's done as it'll start coming away from the side of the bowl.


Roll into small balls and pop into a mini cake cases. My ball rolling skills started out a bit rubbish. Who can't roll a round ball?!


Top with a chocolate curl just because it makes them look prettier.


Put in the fridge for at least 30 minutes and enjoy! Easy! Worth noting that Zach also just described them as tasting like a cold brownie. I make him right on that one.

Craft Tools: Starter Basics

I thought i'd continue along this 101 series today and touch upon some craft tool basics. I can get a bit carried away when it comes to craft related gadgets so sometimes it's nice to take a step back and simplify things a little bit. Do I own a staple gun? Yes. How many times have I used the staple gun? Once. You know what I mean...? At the same time, there really is some small essentials which can  get you started crafting and can be used for lots of different projects. 


1. X-Acto Knife: A sharp, small, precision cutting tool for thick card and paper. An absolute must for anyone who wants to try paper cutting or wants a straight edge.

2. Cutting Mat: Seriously, buy one of these because a) if you use an x-acto knife on any surface, you're gonna scratch it and b) cutting on surfaces other than a self healing cutting mat will blunt your blade FAST. 

3. Scissors: My number one must have is multipul pairs of good quality scissors. Ideally you should have a pair for cutting paper and a pair for cutting fabric. As Martha Stewart says "Don't use your paper scissors, which will eventually go dull, to cut fabric as it will create pulls." I also recommend having a small pair of non stick scissors too, especially if you're working with anything that has a stick to it like washi tape. Plus, it's always handy to have more than one pair because scissors are notorious for getting lost... or is that just me?

4: Paper Creaser/Bone Folder: I was always a bit like, what's the point of this? Then I bought one and I "got" it. If you want a nice, crisp, clean fold to paper/card (we've all used our nail only to find our dry nail polish has magically transferred to the paper) it's worth picking up one of these. A set is usually under £2. 

5. Paper Punches: Available in SO many different designs, these are essential to any budding card maker or scrapbooker. Addictive to buy and use!

6. Eyelet Punch: The eyelet punch i've shown here is for paper and card, great for making your own gift tags for example, but you can also get a heavier duty punch to use on fabric and leather.  

7. Craft Tote: Not a tool as such but trust me, you can end up with so many crafty bits and bobs that having them all in one place makes sense. My only problem is I now need an even bigger tote bag! My favorite ones are made by Papermania. 

8. Rotary Cutter: Cuts a long straight line in fabric or paper. I find this useful when using felt to get nice straight edges which you don't always get freehand with scissors. 

9. Chain Nosed Pliers: Pliers and wire cutters are both needed for jewellery making. Chain nosed pliers are great for opening and closing jump rings and fiddly jewellery fastenings. 

Have you got any recommendations for crafty starter tools? What's your number one essential? 

Glue 101: What one should you use?!

Now, while this may not seem to be the most pretty of posts, glues and adhesives are probably one of the most used and needed crafting tools out there and, well, sometimes its hard to know exactly which one TO use! I know in the past i've had the tendency to just grab anything and hope for the best, usually resulting in either something not sticking properly or making card go soggy. This little glue 101 hopefully will help! You'll also note that I haven't mentioned super glue simply because it's only good for sticking your own fingers together! Banish that s***!! 
1. Modge Podge: The decoupage glue of choice. Not only does it stick paper and fabric to most surfaces it also acts as a sealant and finisher too. This is a great choice for covering paper mache boxes and letters in paper or fabric but can also be used to seal your paint work too.

2. Hot Glue Gun: Handy, easy to use and great for a wide range of crafts. Especially handy for making felt flowers, and sticking plastic animals to the top of jars! You know the ones! I would suggest not to go for the mini glue guns as they weigh absolutely nothing and don't actually balance when you put them down. I end up resting mine on my leg and get burnt. Learn from my mistakes!

3. UHU Glue: Now I have to admit, this is not my favorite glue even though it does stick well and dry clear. This is probably one of the most popular 'all purpose'  glues in the UK and can be used to stick metal, glass, rubber, wood and plastic. You can of course use this on paper but I find it far to wet and it also does take quite a while to dry. If you're making something that you need a little time to position before it dries, this is a good choice.

4. Tape Runner: This is my new favorite thing and I don't know how I lived without one. Perfect for paper projects, simply run it along the area you want to stick and a strip of sticky yet dry (that makes sense right?!?) glue tape is dispensed! You can even buy them in Wilkos!

5. Glue Dots: Pretty much the same as the tape runner but a roll of small glue dots rather than a continuous strip. Ideal for card making.

6. Glue Pen: Another stupidly handy, quick and easy way to stick paper. Allows a lot of precision which you wouldn't get with something like a Prit Stick and is stronger too. On a side note, I would probably only recommend Prit Stick for crafting with kids.

7. Tacky Glue: This is the glue to use for fabrics, leather and the like, although again, it is dubbed as a more multi purpose glue. Dries clear and is flexible.

8. Gorilla Glue: 100% water resistant that is sandable, paintable and stainable once dry. Mainly used for repair work.

9. E600: The crafters holy grail glue. Will stick metal, plastic and wood and because of it's strength and crystal clear finish, is highly recommended for anyone who makes jewellery. You can buy it online in the UK from The Bead Shop.

Youtuber of the week: DIY Superwoman

We all like to have someone to aspire to right? Like me, I look at Martha Stewart and Karren Brady and think 'yep, I would quite happily aspire to be a combination of you two!'. Well I now have another superwoman to add to the list and she comes in the form of a DIY badass. Ladies and gentlemen, behold the awesome Sandra Powell.

While casually browsing the 'Tube, I came across Sandras video titled 'The Closet Sandra Built' - 2m 26s of admiration not only of her skill but also... THAT CLOSET! So good I just had to share!


If you fancy getting a little more 'hands on' with the power tools, watching her build a (my dream) library or fancy watching her Tennessee home tour, she is most definitely one to subscribe to!! Check out Sandras channel sawdustnpaperscraps HERE.

Snail Mail Revival: Post got pretty

Now don't get me wrong, I am fully loving the 21st century. There really is a lot of benefits to it, advances in medical science, air travel, the fact I can play Candy Crush on my iPhone on the tube... (I know... shouldn't admit to that one) and whilst instant communication is now fully integrated in daily life, lets face it, it's still nice when something drops through the letter box, a birthday card, a thank you note, anything personal that doesn't start with 'Here's your bill'.


So lets go back to way back when; before email, before whatsapp, before text messages, before Skype, once upon a time you would actually have to sit and write someone a letter AND without the use of a spell checker. Now i'm not saying I want to go back 50 years and have to wait 3 days for a bit of gossip from my best friend but I really do miss the excitement of letters and postcards. Luckily there also seems to be a lot of other people who feel the same and because of this, post circles are cropping up all over the place. Think of it a little like the modern day penpal or just an excellent opportunity to send and receive pretty post. 


I first heard of Post Circles through the gorgeous Janettes blog The Pampered Sparrow and she is also doing a 3 part blog post on everything from stationary, what to send and packaging it up so do go over and check that out! 

Naturally it's a) made me want to be involved and b) given me yet another reason to look through Pinterest and pin envelopes and ways to decorate them. 

A couple of minutes later, I knew what the world needed, a bright pink Grumpy Cat bubble mailer. Now come on, who wouldn't want to see this waiting for them on the door mat?


The great thing is, you can really go to town on the decoration and it's easy! I pulled off a couple of cat pictures from google, printed them out and stuck them onto the bubble mailer. I used washi tape, heart stickers and some random self adhesive gems I had laying about and drew out a speech bubble for the address label. Grumpy Cat in a party hat was a touch! Haha! The next person to order from Haus of Glue will get their order sent out in this!

You can also find out more about the Post Circle by checking out Miss Beatrix's blog HERE!

Desktop Calendar Wallpaper: May 2013

{Click HERE to download for free!}