Share the love: A Beautiful Mess
When I come across a new blog, especially one that I want to read from start to finish AND when it has DIY tutorials I want to make, my heart races just a little bit.
Therefore, it's only right I share the love so you can also get excited!
Elsie Larson's blog A Beautiful Mess is 'a blog full of pretty things you can make and wear' and you know what, she's not half right! Most defiantly my current favorite and i'm sure it will fast become one of yours too.
The tutorial section is SO frickin' good! Inspiring tutorials that you will actually want to make and, explained fantastically. I know how hard it is to think of usable tutorials but these are on another level!
The beautiful design and photography is not surprising really as Elsie also has a photography section giving you lots of tips from taking better photographs to a camera list! Photos are one of my weak points this is amazingly helpful.
The decor section is amazing! I literally want to make everything! I especially love this Instagram canvas wall art.
There's also an outfits section, beauty and treats for you to wrap your eyes around!
Every part of A Beautiful Mess will keep you engaged for hours so go forth and enjoy for yourself!
Delia would NOT be impressed
I present to you, quite possibly one of my greatest Poundland finds. I know... I need to stay out of that place but I just cannot resist the draw of it.
Delia would not approve of my £1 microwave cupcake in a cup! Cake 'baking' for the ultimate lazy person.
1) Complex directions here, open up the cup, remove packet of top quality (debatable) mixture and empty back into the cup along with 30ml of water.
2) Stir and microwave for 60 seconds.
3) Leave your light and fluffy (errr) cupcake to stand for 2 minutes.
4) Remove of cup and enjoy!
Now, in all fairness, it doesn't look THAT bad and it didn't taste THAT bad... although the texture was a little bit like chewing on a sponge you use to wash the car.
In conclusion, the lazy girls baking companion scores 3/10, mainly as i'm impressed that I ended up with some sort of cake in 60 seconds but not because it was in any way delicious.
I did also pick up a couple of Accessorize nail polishes from Superdrug, a pale khaki green colour called Wyoming and a neon pink called Hot Pink. I like.
I'd also discovered that my housemate Dave had the worlds supply of glow sticks upstairs from a dance production he choreographed so I thought we could try making some glow lanterns after I saw them on Pinterest.
To be honest, I wouldn't recommend trying this as there's tiny pieces of glass like material in the glow sticks and that liquid gets everywhere!
This baby did glow for quite a while though!
I think I would prefer to get some glow in the dark paint and make some of these stars in jars that I saw on simplycreativeinsanity.
You have to try these things right?
L x
DIY Piñata Lampshade Tutorial
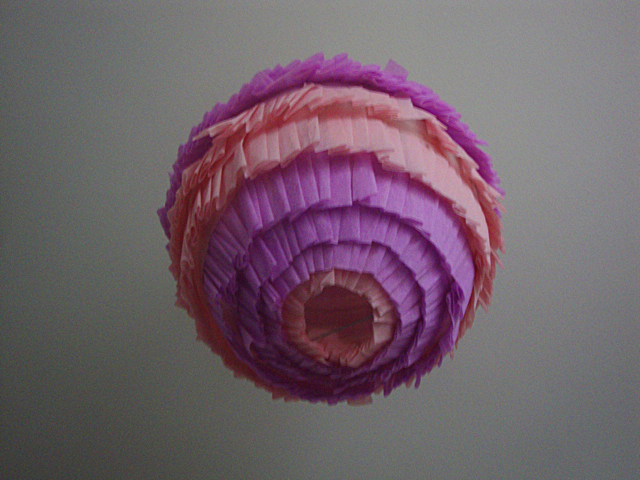
I couldn't leave the crepe paper alone and was 'umming' and 'ahhhing' what to do with it. Seeing as any Jubilee plans were on hold due to the rain, I thought i'd jazz up a paper lampshade to keep me entertained.
It might be a bit of an acquired taste, but these would look cute hanging in the garden too for decoration! (When it's not raining mind!)
If you are going to have this inside, i'd recommend using a energy saving light bulb as these don't heat up as much as normal bulbs do.
To make a Piñata lampshade you'll need:
Crepe paper
Scissors
Masking tape
Paper lampshade
1) Start by cutting your crepe paper into equal size strips. I made mine about 3-4 inches wide but you can make them as thick or as skinny as you like.
2) Cut some sections of masking tape before you start, you'll use lots!
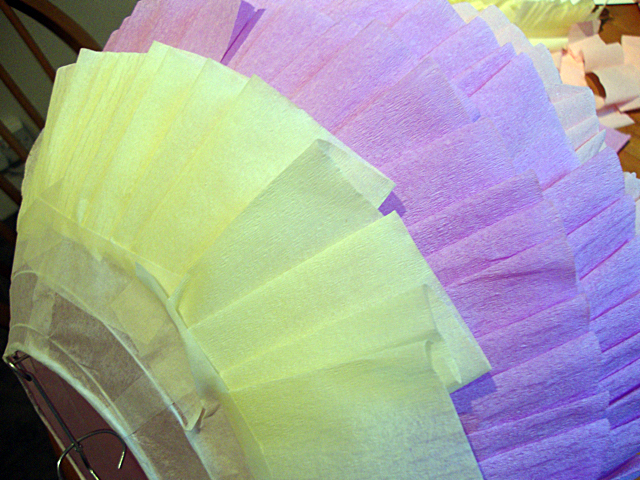
3) Starting at the BOTTOM of the lampshade, create a ruffle with the crepe paper by making looped folds and secure with the masking tape.
4) Continue this all the way around.
5) Do the same with the next section/colour of crepe paper leaving around 1 inch of the previous colour paper showing. You can make this gap wider if you wish and the smaller the gap, the more layers you'll need around your lampshade to completely cover it.
6) Keep going! By this point I was asking myself why I started making this but it'll be worth it!
7) The below photo is a good example of how to create the ruffle fold.
8) Almost done!
9) When you come to do the final layer at the top of your lampshade, stick the masking take inside the opening to secure it down.
10) FINISHED!
11) Hang and enjoy!
Jubilee Cake Time!
I decided to make a cake for the Queens Jubilee and this is how it turned out! It's a bit of a hefty beast but you can never have too much cake right? I used a recipe from the Primrose Bakery book (you can see my review HERE) and as I made it 3 layer cake, I just halved all the ingredients and made an extra sponge.
For the sponge:
210g self raising flour
25g cornflour
225g golden caster sugar
1 tsp baking powder
225g unsalted butter at room temperature
4 large eggs
1 tsp vanilla extract
Food colouring (optional)
For the filling:
115g unsalted butter at room temperature
60ml semi skimmed milk
1 tsp vanilla extract
500g icing sugar, sifted
Strawberry jam
Unfortunately, in true British style, it's raining today so we didn't fancy going down to the river. Boo. Do you have anything planned for the long weekend?
Lisa X
Subscribe to:
Comments (Atom)


