Here's another crafty tutorial for you and I have to say, I especially love this one! I stumbled upon an absolute gem of a blog called The Little Green Box which is packed with pop up card tutorials! Yes it's valentines themed but you could replace the heart with something else if you wanted! I decided to make my own tutorial of the original version to see how easy it was and, hopefully iron out any places we might make mistakes! I'm a pop up card making novice so for a first attempt i'm pretty pleased!

I hope you enjoy and let me know if you give it a go! If you ever make anything from the tutorials on my blog, please do email me a picture thegluegungirl@gmail.com so I can have a look at your craftyness in all it's glory!
Almost time for the weekend to start! Happy Friday!
Lisa X
You'll need:
Scissors
Glue
Pen or pencil
White, silver or gold pen
Ruler
2 sheets of card stock or heavy weight paper


1) Cut the base for your card from the card stock or heavy weight paper to the dimensions 28x10cm and crease in the middle.

2) Using a piece of paper folded in half, draw a half heart shape around 4x7cm. Cut out and unfold to reveal a symmetrical heart template.

3) Place the heart shape on the card’s side and make sure it’s not wider than 2/3 of it. If the card’s side measures 14 cm (“3X”), then the heart’s width should be 2/3 of that – 9.333 cm (“2X”) or less. If it’s any bigger, it’ll peek out when the card is closed, and ruin the surprise!

4) Using your paper template, cut out 2 identical hearts from your other colour card stock or heavy weight paper.

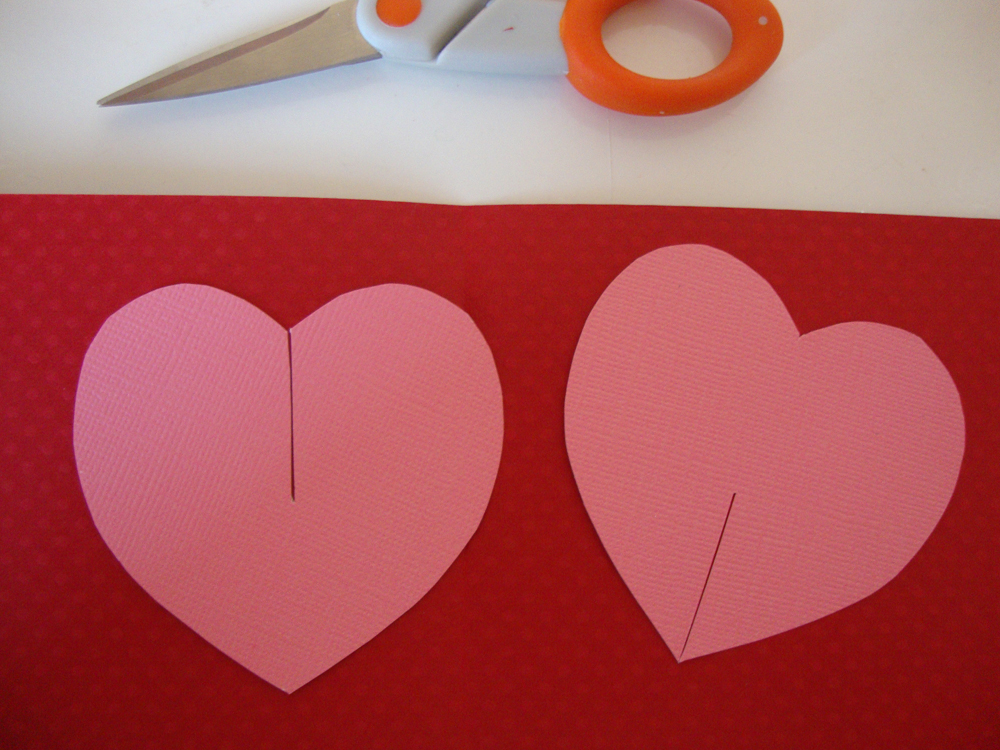
5) Cut 2 3.5cm slits into the top center of one heart, and the bottom center of the other. Make them a little thicker than one slice through.
6) Cut a piece of card 15cm in length and draw lines every 3.5cm across which will leave a small section at the end to use as a tab.

7) Fold the card on each line and then put a small amount of glue on the small tab piece at the end. Once joined, this will make a square.

8) Side your two hearts together so they make one double layer heart with a hinge in the middle.

9) Apply glue to one side of your square.

10) Glue the strip to one side of the heart as close to the middle hinge as possible. Wait for one side to dry and repeat on the other side.

11) Once both sides of your square are glue to you heart, it will look like this. The center crease will be line up with the center crease of your base card and secured by putting glue on either sides. This will create the pop out effect.

12) The white line shows the the center fold that will be on the center fold of your base card. In this case, the glued side will be stuck to the right side of the card. Once both sides are glued and secured, close the card and allow to dry.

13) This is how your pop out heart will look!

14) You can decorate your card however you like but I have taken a white pen and drawn on some little dash lines. You could also use a silver or gold pen.


15) For the front of the card, I've stuck on a strip of washi tape and some glitter letters I had. I also bought a packet of black envelopes from Hobbycraft for 49p! I think it's more interesting than plain white!

16) Just to make it a bit more decorative and tie into the middle of the card, I've added on some dashes to the envelope edge with a little white heart.

The End!
0 comments:
Post a Comment